
IMPORTANT:
If you run into any issues at any point in the guide, please be sure to check the FAQ.
If your issue is not addressed there, join the Discord for support.
Manual Downloads
Root Mods
The following mods are special because they need to be installed directly into the game's Root folder, not through Mod Organizer 2.Use the Manual Download and follow the instructions provided for each mod.
Failing to install these mods correctly will result in issues.
Fallout 4 Script Extender (F4SE)
Extends the scripting capabilities of the game.Installation instructions
- Main Files - Fallout 4 Script Extender (F4SE) 0.6.23
- From the downloaded archive, move everything to the game's Root folder.
-
After proper install, your Root folder should look like this:
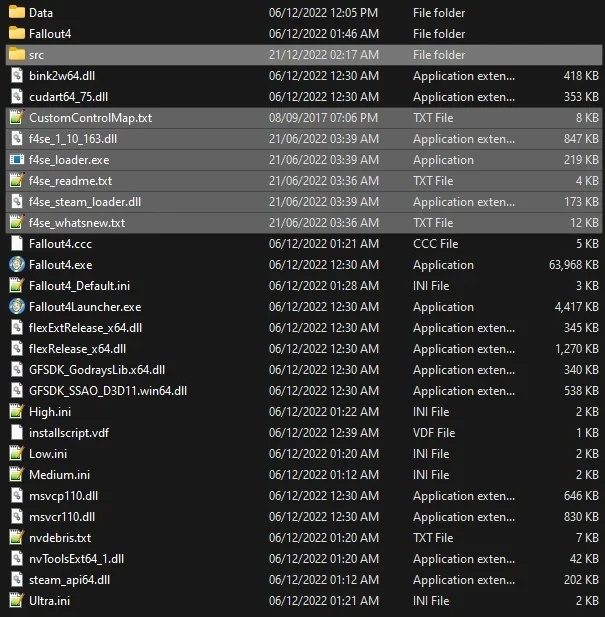
If you do not know what the Root folder is, read the Key Terminology.
The direct link to an older version is intentional to grant compatibility with the downgraded EXE.
Downloading through the link button above is especially important when the guide specifies the exact version, like for this mod and more later.
Making MO2 Detect F4SE
-
Once F4SE is installed as instructed above, restart MO2 and you should see a new option in the top right drop-down:

xSE PluginPreloader F4
Allows preloading F4SE plugins before the game initializes.Installation instructions
- Main Files - xSE PluginPreloader F4 0.3
- From the downloaded archive, move everything to the game's Root folder.
Simple Fallout 4 Downgrader
A simple one-click downgrader that doesn't require any login credentials.Installation instructions
- Main Files - Simple Fallout 4 Downgrader - for v1.10.984
- From the downloaded archive, extract everything to the game's Root folder.
- Double-click on fo4downgrader.exe to run it.
-
A command prompt window will open and it should say:
Patching successful
- Close the command prompt and backups with _downgradeBackup appended to their name should appear in the game's Root folder.
Mod Organizer Downloads
Managed
From now on, select Mod Manager Download to download mods - this will make the file appear in MO2's Downloads tab, ready to be installed according to the instructions earlier in the guide.
Creating a Separator in MO2
- Right-click the empty space in the left pane of MO2 and select Create separator.
- Name the separator Utilities.
Address Library for F4SE Plugins
Resource required by most F4SE plugins.Installation instructions
- Main Files - Address Library - All In One
Backported Archive2 Support System
Allows the downgraded executable to use the updated BA2 files.Installation instructions
- Main Files - BackportedBA2Support-1_0
Console Commands Extender
Adds new commands and overhauls existing console commands.Installation instructions
- Main Files - Console Commands Extender
Better Console - F4SE
Makes console menu show extra useful infomation.Installation instructions
- Main Files - Better Console
High FPS Physics Fix
All-in-one solution for smooth FPS-unlocked gameplay, mitigates stutter and reduces loading times massively.Installation instructions
- Main Files - High FPS Physics Fix 0.8.6
- Once the mod has been installed, double-click it in the left pane of MO2.
- In the INI-Files tab, open F4SE/Plugins/HighFPSPhysicsFix.ini
- Change the following options:
- Set AllowTearing to true (line 26).
- Set DisableBlackLoadingScreens to true (line 37).
- Set DisableAnimationOnLoadingScreens to true (line 44).
- Set PostloadingMenuSpeed to 3.0 (line 51).
- If you use VRR (G-Sync/FreeSync), set InGameFPS (line 58) to any value close to your lowest FPS and not exceeding your refresh rate - (refresh rate x 6.8%)
- If you use fixed refresh rate (meaning no VRR), set InGameFPS (line 58) to your refresh rate - 0.005 or fractions of your refresh rate. For example on 60hz you can lock to 59.995 or 30. Just like on VRR, choose whether to lock to a fraction or RR-0.005 based on which is closest to your lowest FPS.
- If you set InGameFPS to a value higher than 60, do the following as well:
- Set DynamicUpdateBudget to true (line 264).
- Set BudgetMaxFPS to the same value as InGameFPS (line 283).
Enabling AllowTearing allows the mod to disable VSync during loading in order to make it faster, since the game loading time is largely limited by current framerate (up to a certain point). Enabling it will NOT lead to any tearing during gameplay. This setting is also a requirement for VRR.
Enabling DisableAnimationOnLoadingScreens will freeze loading screens and any overlay you use, this is intended and will lead to way faster loading times. You can omit it if you prefer looking at animated loading screens.
You can check if you are using VRR by going to the Nvidia Control Panel if you're on Nvidia or Adrenalin's Display Settings if you're on AMD. If the G-Sync tab is missing from NVCP, your display doesn't support it or doesn't have the feature enabled in OSD.
NVIDIA USERS ONLY:
Make sure that G-Sync is set to Fullscreen and that Display Specific settings are enabled in the Control Panel, the Windowed option is problematic due to it being a hacky method. Both of the settings are wrongly named so they do not actually directly refer to the display method.
RobCo Patcher
Allows modifying game data without the use of plugins.Installation instructions
- Main Files - RobCo Patcher
Random Encounter Framework
A simple framework that allows mod authors to safely use the base game's random encounter story manager.Installation instructions
- Main Files - Random Encounter Framework
Lighthouse Papyrus Extender
Adds new scripting functions for mod authors.Installation instructions
- Main Files - Lighthouse Papyrus Extender
Garden of Eden Papyrus Script Extender
Just like Lighthouse, this adds new scripting functions.Installation instructions
- Main Files - Garden of Eden Papyrus Script Extender
Papyrus Common Library
Provides a common set of tools to be used with Papyrus.Installation instructions
- Main Files - Papyrus Common Library
Console Autocomplete
Adds command autocompletion to the in-game console.Installation instructions
- Main Files - Console Autocomplete
RAW INPUT - The Ultimate Mouse Sensitivity Fix
Disables mouse acceleration and more.Installation instructions
- Main Files - RAW INPUT - NMM Installer
- You will be prompted with a FOMOD installer:
- Select the option you prefer
- Install
